Archive of ‘Homemade’ category

Blue Apron

By Natalie

imageBrandon recently discovered this meal delivery service going by the name of Blue Apron. He sent me this honest review to look over, and we decided we should give it a shot. The service offers a 2 person plan with 3 meals a week, and a 4 person plan with 2 meals a week, charging 9.99 a person, per meal. The thought of 3 less meals to plan and shop for was intriguing enough for me, because time is money, and my least favorite chore is meal planning. I fall back on the same recipes often, stick to the same meat and veggies, cooked the same way, and blah blah blah blah blah. I made a pretty good crockpot chili recently, so two weeks later I made it again. And this crockpot chili.. it made A LOT of chili. So here we were eating chili two days in a row for lunch and dinner two weeks apart. Worse things have happened at dinner time I absolutely realize this, but after four years of cooking for two I am fresh out of ideas.

I signed up for Blue Apron after I found a $20 off coupon from a Facebook ad. I was sold. Half the time wracking my brain for yummy meal ideas I hated cooking, and slicing off some time in the grocery store. Absolutely I’m in.

With Blue Apron you can view the menu for the week before it ships, and you choose the day it ships to you.. What the what? We buy everything we can on Amazon, and that’s not a big deal. We order Bingley’s food from Chewy, because it’s not sold just anywhere, and it’s cheaper online! So sure I’ll take a 28lb bag of dog food autoshipped straight to my DOORSTEP every 6 weeks.. because hello? Convenient. Why on earth have we not ordered dinner straight to our door that’s not take out sooner? Beats me! You can also check off certain meats you do not want to receive, opt for the vegetarian meals.. And you can cancel at anytime. Sold. Right?

image

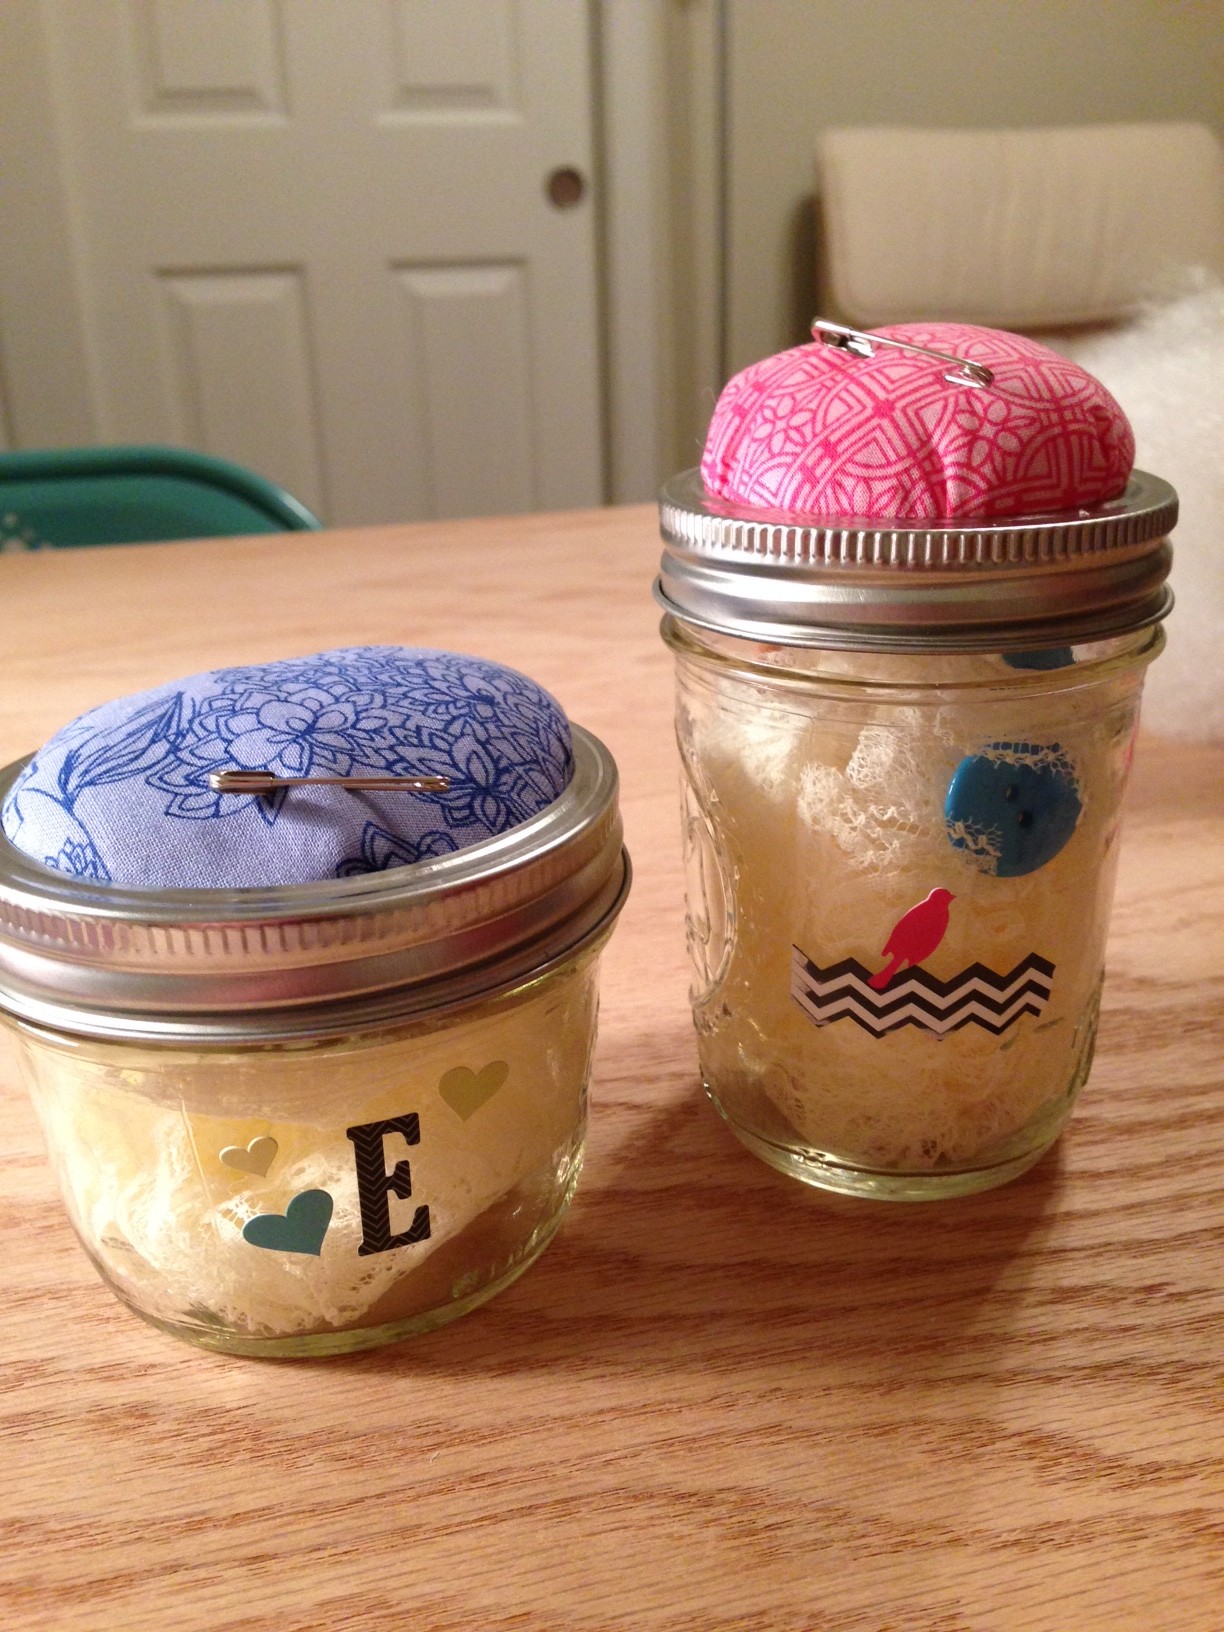
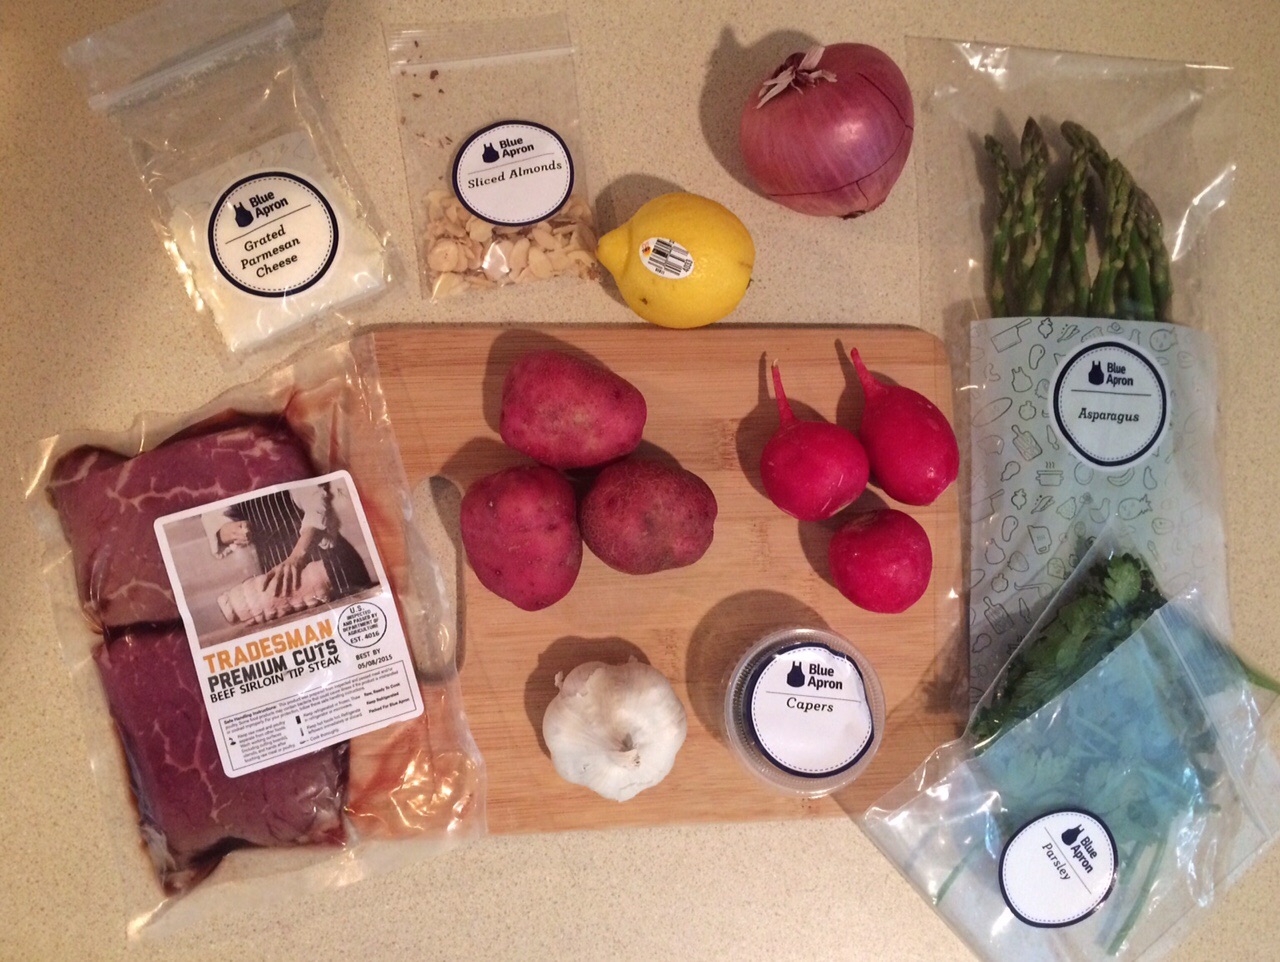
A few days ago I recieved my first box, and I have never been so excited to see a box full of vegetables in my life! Our ingredients came in a refrigerated box, along with step by step photo recipe cards, and a letter stating where the vegetables had been grown. I started pulling out these vegetables I had never cooked or even heard of before like Celeriac, or Celery Root, Fennel Bulb, and Fronds. I placed the veggies in the fridge unsure if I was going to be a fan of the mushrooms, and mostly certain I’d be in over my head with those radishes.

image

After putting the veggies away I placed the ice packs that covered the meat in the freezer, cause they fit perfect in our cooler, and once we start to collect too many Blue Apron suggests that you recycle them, or donate them to boy scout troops, or food shelters.

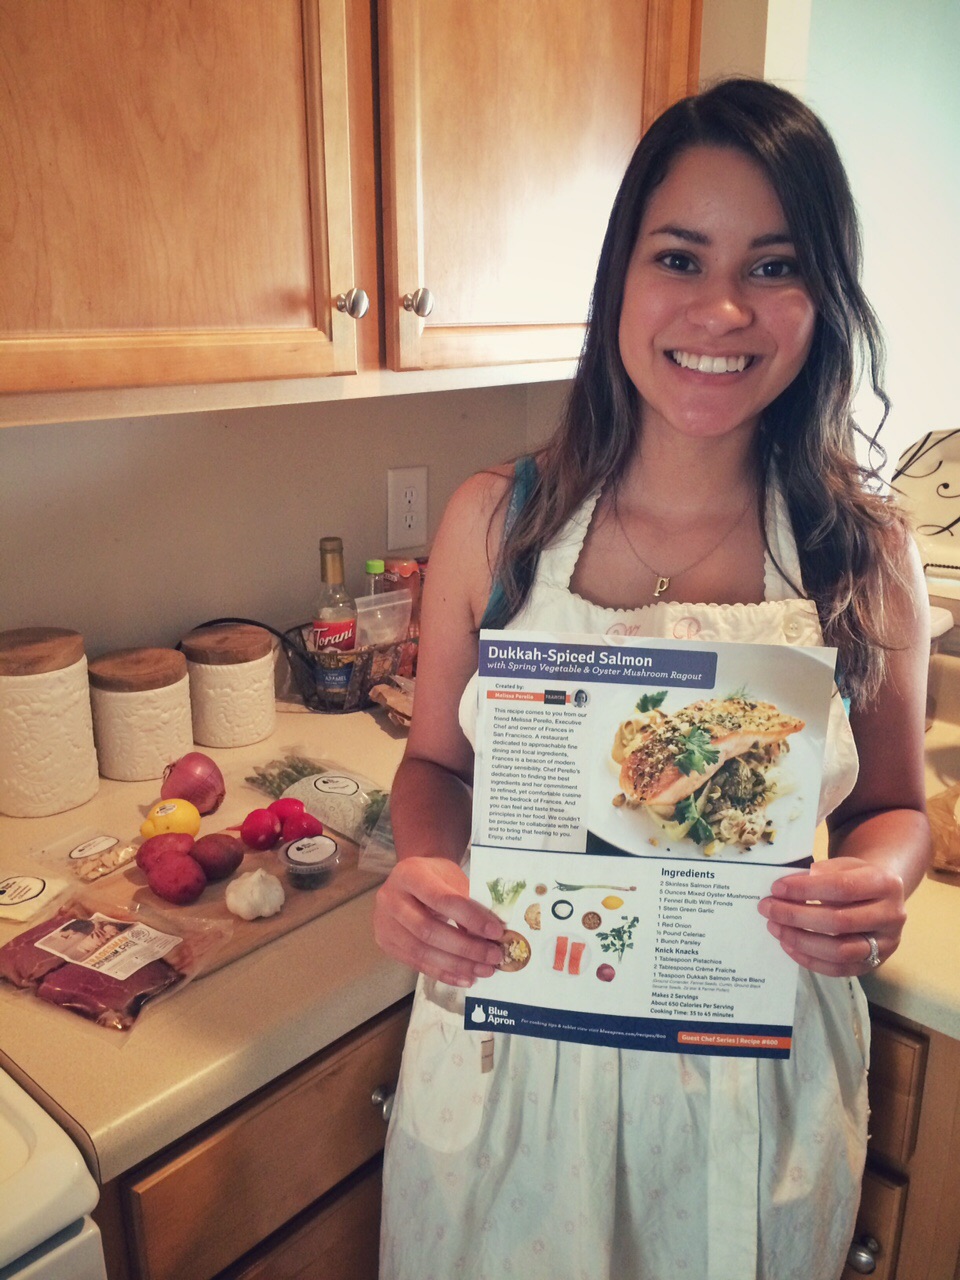
Saturday night I made our first meal and it was fantastic! Hello tastebuds, I never knew Salmon I cooked with these two hands would ever taste so good!

image

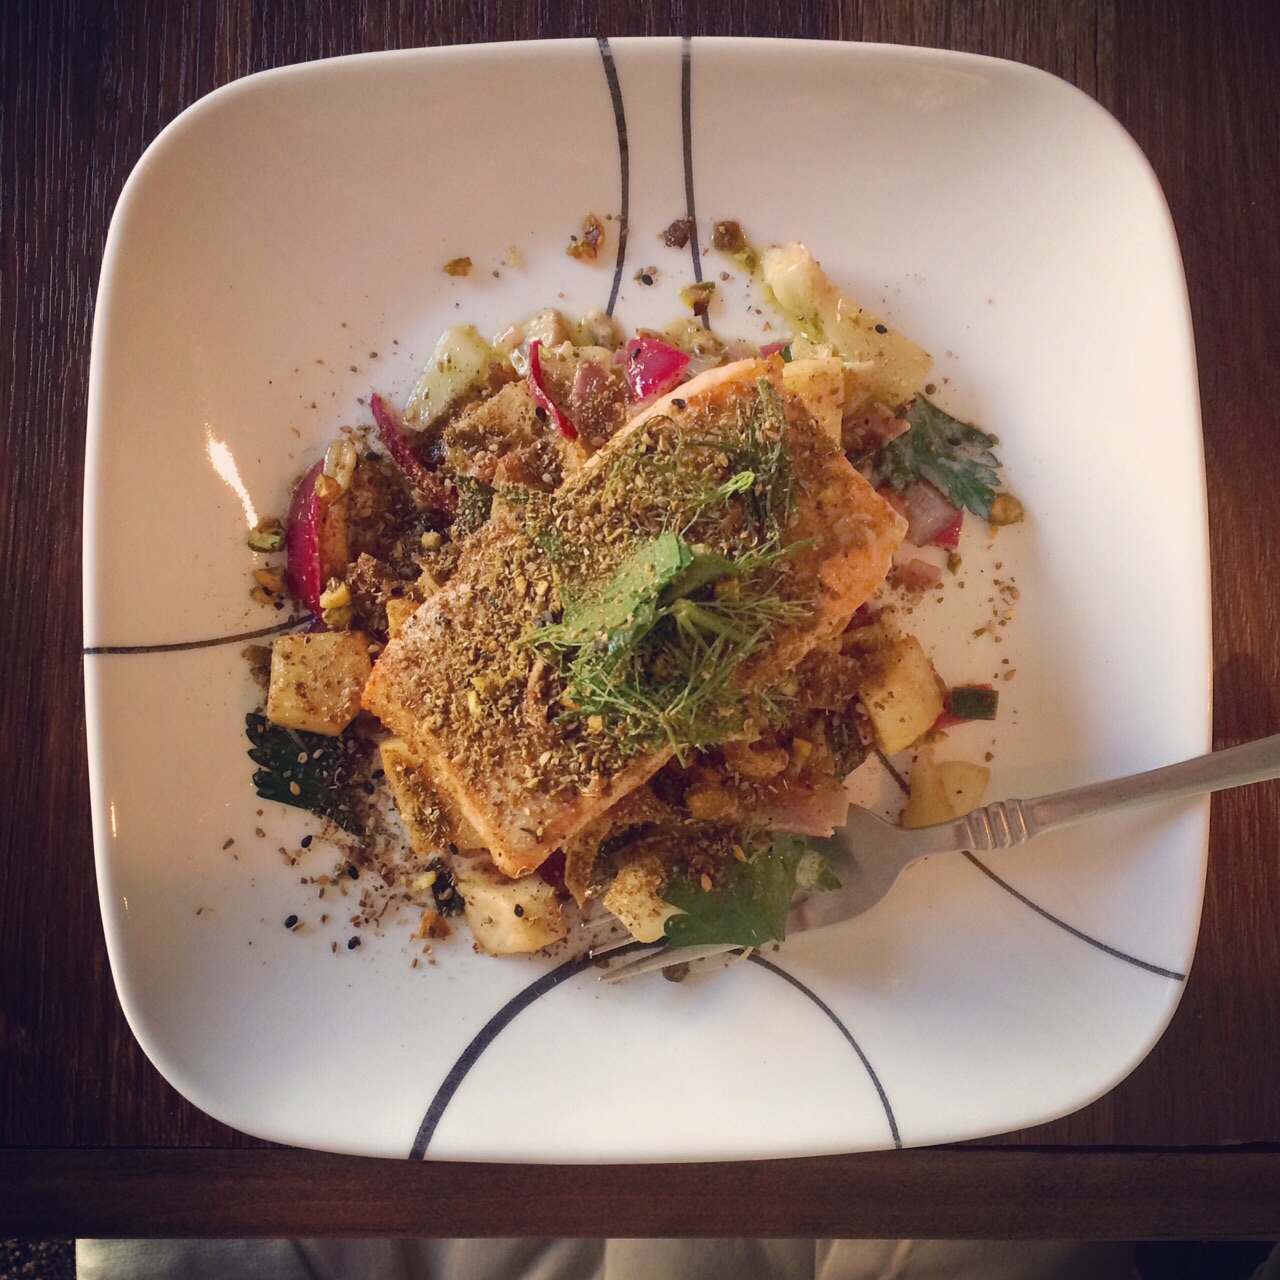
Dukkah-Spiced Salmon

I always thought that I hated cooking. Hated the planning. Hated the shopping. Hated the preparing, and measureing, and figuring what veggies go well together, and with what meats. I’ll admit the majority of meals lately have been chicken, and pork chops, baked with some generic seasonings, and breadcrumbs. Salad, frozen steamable veggies, sweet potato, or asparagus on the side. Zucchini is about as exciting as it got with veggies in the kitchen. Simply roasted on the stovetop with some salt, pepper, and olive oil. Cause.. I don’t know.. what else do you do with a zucchini? I’m a twenty three year old wife trying to cook an appealing dinner. I need to learn these things like what on earth else to do with that zucchini.

…So I’ve hated cooking for a long long time. Settling for Breakfast for dinner way too often, or eating out more than is necessary, or Brandon’s personal favorite, griping and complaining about how now I have to make dinner because it’s already 5:30, and that’s about dinner time, and never mind the fact that I was perfectly comfortable on the couch, I have a husband to cook for.

image

But now… Blue Apron has made me appreciative. I have a husband to cook for. I have a husband I get to show off my fancy meals to.. And he delights in their flavor, and sends compliments across the table. Giving kisses when his plate is clean, and his belly is full.

image

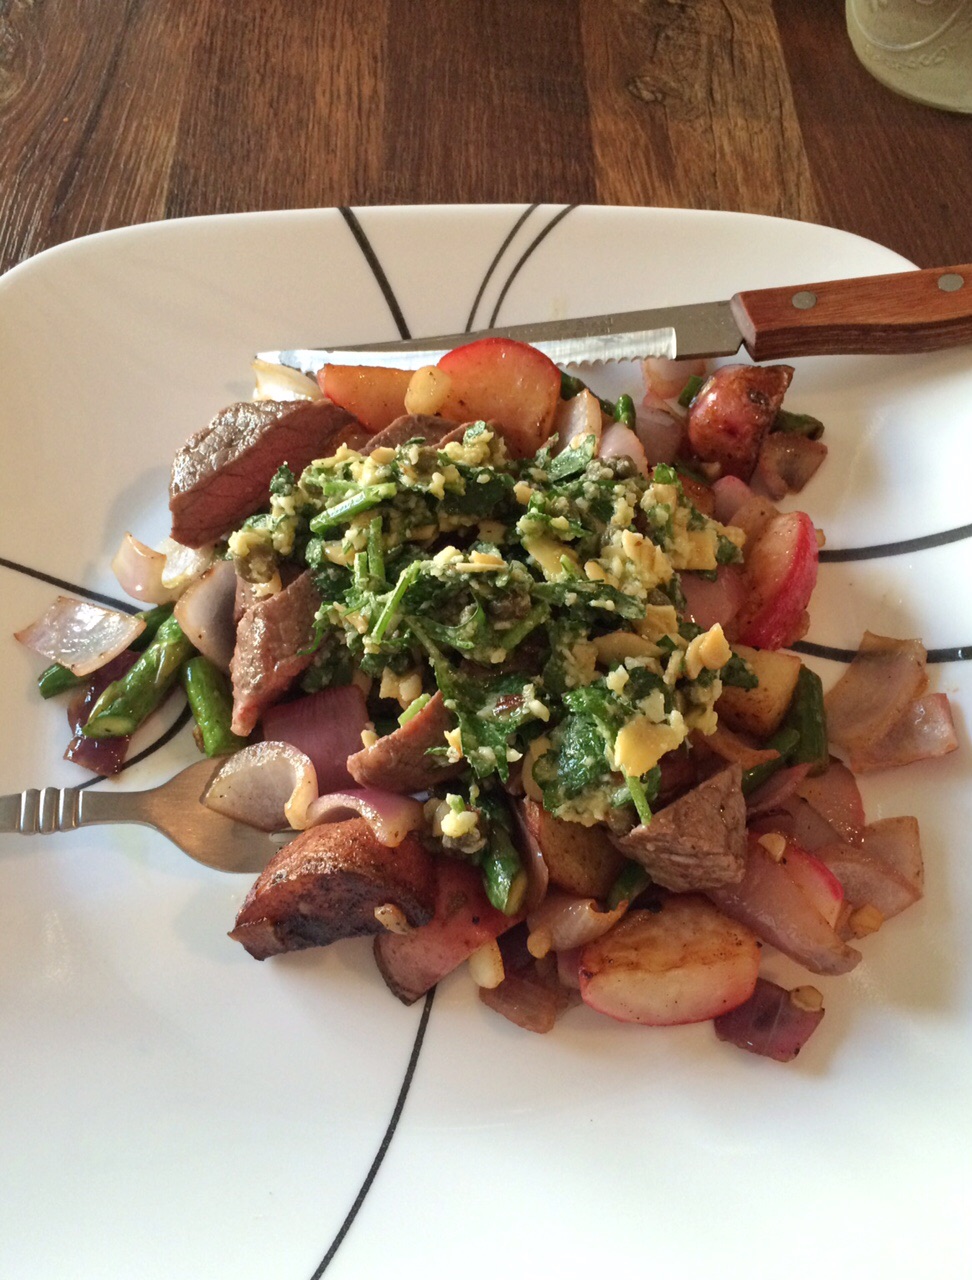
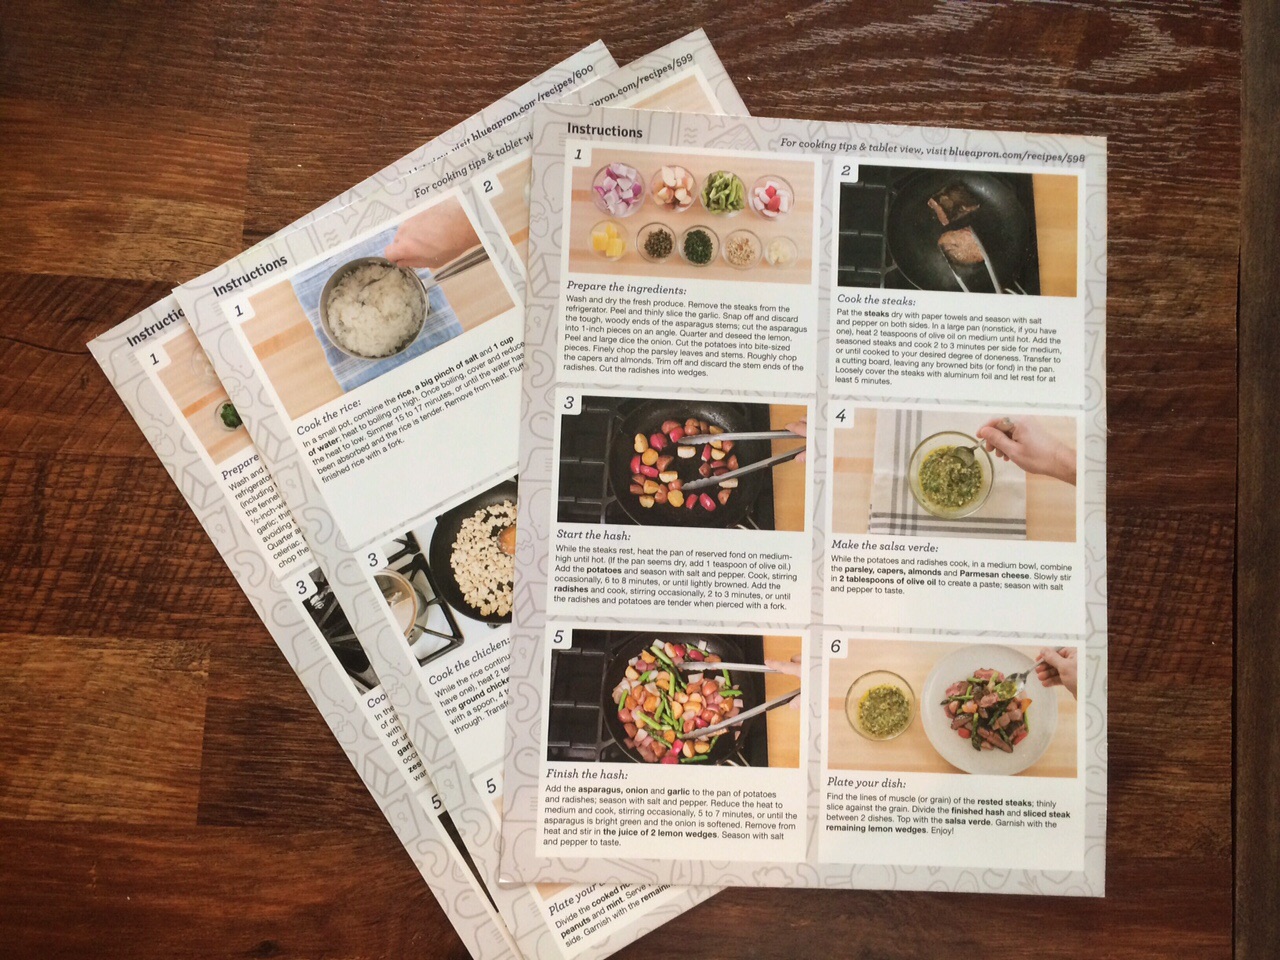
Sirloin Tip Steak with new potato, asparagus, and radish hash

I realized in the midst of this meal prep that a diced red onion, fresh green parsley, finely chopped pistachios, and freshly squeezed lemon juice all smells pretty dang good together. So good my eyes were watering from the potency. Those smells are welcome to stay in my kitchen forever.

When I signed up for Blue Apron I was only expecting to have a few meals a week taken care of. But it’s been so much more. Not only is their website an excellent resource for recipes, but I’m also familiarizing myself with several different foods, and spices I’ve never heard of, or would have tried otherwise. Which I hope will allow me to eventually create my own new recipes.

I understand meal delivery plans are not for everyone, but I had to share our positive results. Just keep in mind they’re not particularly cost effective, but they are super tasty, and a great kick start if you have a bad case of the meal planning blahs.

And guess what? I was a fan of the mushrooms.


Weekend Update

By Natalie

This fabulous piece of art was completed last week, and it’s even better than I imagined. When making your own furniture you experience this moment of fear once you have all your supplies. And you think “Hmm.. is this really going to come out the way I want it to?”

Lucky for us, it always has! You can find the craft desk B and his dad made for me here. Brandon had this genius idea to make a table with wood flooring, and I’ve been wanting to make something with pipe. So we merged our two ideas, and voila! We ended up with this glorious creation!image

image

In other Poe news…

imageI got some much needed quality friend time with Chloe this past weekend. She conveniently dropped her pup off for some gun dog training in Georgia, and on her way back home, she stayed with us for the weekend. All weekend I had some girl time. Which you never realize you need, until you’ve had it. I could tell you all about our time together, but I usually find it difficult to put Friendship into words. There’s a certain comfort I feel when I am in the presence of an old friend. A comfort where I can be silly, and honest, and true to myself. Where we can spend our time together reminiscing on events past, and speak our own language of care to each other. I’ll spare you the girly details that Brandon was unable to escape, and tell it to you simply. We basically shopped, and crafted our little hearts out all weekend. That’s right, apparently when people come visit they bring along their latest diy project, cause they know I’ll be down. A friend who can be by my side happily while I sew, is a good friend.

image

imageimageIt’s 80 degrees in Charlotte, can you believe it? I started swinging Grant in the backyard baby swing today, when I caught a glimpse of a line of ants. They were bustling with life, carrying whatever crumbs they’d found back to their ant hill. Grant smiled with every forward swing as his cheeks caught a little vitamin D. During this beautiful time of year that breathes life into the air, I figured why not invite a little bit of spring into our home? Greenery in the home is a good thing friends. My plants are adoring this sunshine, arching themselves toward the light, spreading their leaves wide to bask in it’s magnificence.

If you remember this post then you know that I have succesfully pieced together my little indoor potted garden. Quite a transformation right?

Here’s a closer look at some of my little green guys. image

imageimage

Don’t they just make you happy? Inspiring life, and growth with their vibrant green hue. Now you want to go get yourself some house plants. Don’t you?

And to take us out Bingley wanted to say that he had a pretty good weekend too.image

Happy March Everyone!image

DIY: Layer Candle

By Natalie

image

Here’s what you’ll need…

  • Glass JarPreferably with a wide mouth
  • WicksFound in craft stores
  • 7-8Depending on the jar size used candles from the same scent family
  • Tongs
  • Pot
  • Pot holders

I’m a big fan of candlelight, so I needed to find a way to use up every drop of my candles. Candles typically blow out with about 1/2 an inch of wax left over. When this happens stow your candles away together to be made into a new layer candle. This project is fairly easy, but keep in mind it can be time consuming to do all at once.

I used 8 left over candles in a wide mouth, pint sized mason jar. Be sure to only layer scents in the same scent family. i.e keep fresh linen with sea breeze, and hazelnut with sugar cookies. My candle was a vanilla, pumpkin, apple pie, lemon, sweet scented combo.

imageThe trickiest part of creating this candle is getting the wicks to stay in place. I’ve tried hot glue before, adhesive, and nothing seemed to work. Your best bet is to place 2 wicks in the center of the jar. In the case of one sliding off to the side you’ll have another to even it out. I’d recommend placing the wicks in the center of the jar, and pouring your first candle’s wax in, allow it time to harden, and then continue. I placed little skewers on the jar to try and keep the wicks from falling.

image To melt down the wax boil a pot of water and set your candle inside being careful that no water enters the candle. The thicker the jar the longer it’ll take. Swirling it around often with tongs will help to distribute the heat, and melt the wax faster.

image  imageOnce the wax has fully melted pour it into your jar and allow it time to harden. You could place it in the fridge in between pours to let it cool. Continue doing so until you have melted down, and poured all of your candles.

image

Originally I started with 6 candles, and they did not quite fill the mason jar I had. I decided not to cut the wicks and wait until 2 more candles were finished off. I had one candle that was almost out, and all the wax was liquified. That’s when I realized a shortcut. I grabbed the unfinished layer candle and went ahead and poured the wax in.

Essentially you could skip the time consuming boiling pot of water step, and whenever your candles are about to go out, and are completely liquified pour them into a prepared jar. It’s much quicker, and easier that way.

Look at all those pretty layers. Cut the wicks and enjoy your new candle!

image

image

image

DIY: Fabric Scrap Light Garland

By Natalie

image

Here’s what you’ll need:

  • Christmas Light StrandI used a white strand
  • Rotary Cutter or Fabric Scissors
  • Fabric Scraps

This is probably one of the easiest DIY projects I’ve ever done. I had an extra strand of christmas lights sitting around so I decided to put together a garland on a whim. Sift through your scrap fabrics, or grab a few squares of fabric from the craft store. I’ve been experimenting with mixing textiles so I chose to go with  flannel, cotton, and lace fabrics.

Slice up the fabric of your choosing into about 1in strips. Some of mine came out skinnier than that, some wider. That’s the beauty of this project, it still turns out great! My strips were different widths, and lengths.

A rotary cuttter is the easiest way to cut your fabric for this project. I used this Fiscars set.

imageAfter you’ve cut as many strips you think you’ll need start tying your fabric around the light strand in a single knot. I did three strips in between each light, which seemed to flll the space well. This is the time consuming part.

imageYou’ll end up with this heap of cozy lit fabric. Place on a mantle, stair well, entryway, or wherever needs to be decorated! I placed ours in the kitchen which mirrors our tree in the living room.

image

image Happy Crafting!

This November

By Natalie

Well it’s November. In my mind that calls for a few really good cups of apple cider and caramel. One really bad change of weather head cold. Mittens and scarves, and a few loaves of homemade Pumpkin Bread for good measure. I’ve been abiding by all of these lately including the rather unfortunate cold. I’ve survived it ladies and gentleman, and have returned to tell you the tale. There was a whole lot of coughing, and sniffling. Tea, tissues, Nyquil and I even broke out the snuggie while resting up with some classics on Netflix. That was this past week in a nutshell. Me sadly making my own chicken soup, realizing I’d long past the age and independence where my mother would make it for me. What a sad day that was. She makes the best chicken soup. But I’m on to her, she adds an extra pinch of love I think. Here’s the Chicken Soup Recipe.

Back to being ill. I was a mess.

I’m telling you, if you can find someone who loves you through the crusty nose, fatigue, and vicks vapor rub on your chest you’ve got it all. You don’t vow in sickness and in health for nothing. Because I’d argue that when you’re sick, you come closest to the truest version of yourself. Trading stye for comfort, loving for needy, and daily tasks for extra sleep. That’s why it’s so important to have a companion who’s aware of the real you. Because no matter how independant we try to act it’s nice to be taken care of every now and then.

Do you want to know a secret? I’m feeling better now, and I’m sort of bummed out because B has been learning through every sickness how to better care for me. He’s been by my side just to keep me company. Reminding me to laugh at my severe congestion, and succumbing to most all of my silly requests. So yes, I’m going to miss it. Not only was it the extra hubby care but the snuggles with a pup who knows I’m not feeling well, and the ‘Woe is me’ on the couch talk that got me whatever I wanted. During this month of thanks I’m grateful for my health now, but even more grateful for a husband who’s there when I need him most.

As for my plans for the rest of the month I’ll be loading up on my chewable vitamin C, because as much fun as it is to cuddle with the kiddos at work while I’m sick it’s even better to run around and play when I’m well.

B and I will be traveling to Fredericksburg to see the fam for Thanksgiving. We’re signed up for green salad, and pumpkin bread this year, because I make a mean pumpkin bread. In fact, I’ll even share my recipe with you…

Homemade Pumpkin Bread

image

Ingredients:

  • 1 can (15oz) Pumpkin Puree
  • 4 Eggs
  • 1 cup Vegetable Oil
  • 2/3 cup Water
  • 2 3/4 cups White Sugar
  • 3 1/2 cups All Purpose Flour
  • 2 tsp Baking Soda
  • 1 1/2 tsp Salt
  • 1 tsp Ground Cinnamon
  • 1 tsp Ground Nutmeg
  • 1 tsp Ground Allspice
  • 1/4 tsp Ground Ginger
  • Glaze (Optional)

Directions:

  1. Preheat oven to 350 degrees F. Grease and flour three 7x3in loaf pans.
  2. In a large bowl mix pumpkin puree, eggs, oil, water and sugar until well blended. In a separate bowl whisk flour, baking soda, salt, cinnamon, nutmeg, allspice, and ginger. Stir dry ingredients into pumpkin mixture until blended. Pour into loaf pans.
  3. Bake for 50 minutes in the preheated oven. Loaves are done when toothpick comes out clean.

In years past I’ve made this pumpkin bread as more of a dessert item adding a sugary  glaze to the top of the loaf. Either way turns out delicious! Enjoy!

30 Lists

By Natalie

IMG_5034

I discovered the 30 Lists project on Pinterest a couple years ago, and thought it would be an easy way to get back into crafting, and writing. The challenge is to commit to writing one list everyday compiled in a journal. I decided to do a compilation of lists that I found from Pinterest, and of my own choosing. You could do anything from your wish list, to future goals for yourself, to what you had for breakfast. If you’re interested in starting a 30 lists notebook all you really need is paper and a pen. But, being the crafter that I am I needed to decorate each journal page. (more…)

10 Recipes from the Meal Planning Board

By Natalie

As difficult as meal planning can be it is one of the best things you can do for yourself. Budget wise, and family wise, because let’s be honest who wants to look around for enough ingredients in the pantry to whip something up? All the while starving for dinner after a long day. Husband, and possibly kiddos rummaging around for a bite to eat. In order to assist in your efforts, I’ve decided to share with you my top 10 Natalie approved Pinterest recipes! Most of these I continue to make on a regular basis, especially the s’mores!! They’re a quick and simple dessert perfect for a hubby with a sweet tooth. Here’s a peek at what appears on the Poe table. Click the photos for a link to the recipe. For more yummy recipes you can follow my Meal Planning Board here. (more…)

DIY: Frame Makeover

By Natalie

  photo 2

I made this adorable frame a few weeks ago, and had to share. I’ve had some more DIY stuff recently because I’ve been spending a little more time in the craft room. I love every part of our house, but the craft room is my own pretty little space. A place that is fairly untouched by rolled up husband socks, and dog toys.

Here’s what you’ll need…

  • Frame
  • Washi Tape
  • Hot Glue Gun
  • Flower Embellishment

image


I started out with this old frame I had laying around.

photo 1Picked up the fun glitter tape in the Target $1 section. The flower was found in Hobby Lobby. All I had to do was measure out my pieces of tape, and place them.

photo 3Squeeze a little hot glue on the back of the flower and apply it. Clean the glass to freshen it up. I stuck a piece of scrapbook paper behind the glass so the frame could be utilized as a decorative piece. I love  finding ways to repurpose things. Reviving them, and molding them into something unique.

photo 4


What’s on the Grill?

By Natalie

I’ve talked about the magic of the grill before. If you don’t have one, I’m telling you, you need one! Our grill has saved us from so many hungry disputes. I don’t know about you, but when I’m hungry, I’m not happy. And the grill puts food in our bellies quickly. Get outside! Let your man grill for you. Who can pass up, a man who’s happy to cook with his ridiculously large grilling utensils, less for you to prepare, and less dishes. What are you waiting for? It’s fabulous.

photo 11

Our Favorite Meals on the Grill

Foil Dinners- Here’s my favorite foil dinner recipe.

Steak- Recently we’ve been purchasing tenderloins fresh from Wegmans, and they’ve been more than perfect. B seasons them with Molasses Bacon, and leaves them on the grill until they’re about medium the way we like them. But of course, any meat thermometer will tell you a safe temp. if you’re worried.

photo 22

Burgers and hotdogs- We prepare our own burgers with ground beef mixed with Molasses Bacon seasoning, and a hamburger seasoning. Then form them into patties. Serve with onion, tomato, lettuce, and cheese. Toss on grill until cooked to your liking.

Make your own pizza- We use a ready made dough from Wegmans, and add a little bit of spaghetti sauce to the center. Sprinkle a generous amount of Mozzarella cheese, and add whatever toppings you’d like from there. We’ve done Pepperoni, sausage, basil, & tomato. Toss on the grill for about 5 min, until the cheese has melted.

Beef Shish Kabobs- We’ve prepared our own shish kabobs with sliced beef or chicken and veggies. But we’ve also grilled the already prepared ones from Wegmans and they’re delicious.

Cedar Plank Salmon- Seasoned with garlic salt, olive oil, and meat magic seasoning. B has been grilling these on cedar planks which can be found in most grocery stores near the grilling materials.

Our Favorite Veggies on the Grill

Asparagus-I actually didn’t even like asparagus, until I tried it grilled. Prepare with light olive oil and salt.

Corn with Husk- Pull husks down. Rinse corn. Sprinkle with salt. Pull husks back up. Toss onto grill for about 10 minutes.

Peppers & Onions- We’ve grilled these while on shish kabobs.

photo 44

Your pup is sure to beg for some smokey goodness.

B’s Favorite Seasonings

photo

DIY: Sewing Jar

By Natalie

image_2

Here’s what you’ll need…

  • Mason Jar
  • Fabric
  • Hot Glue Gun
  • Scissors
  • Fluff
  • Things to decorate the outside such as card stock stickers (Optional)

Step One: Cut out a circle of fabric that measures about twice as large as your lid. Extra fabric can be cut if necessary. You don’t want to be left with too little fabric. Step Two: Place a ball of fluff on your fabric, and press the mason jar lid to it. Use a little more than you would think necessary. You want a fluffy top. photo 3

Step Three: Squeeze hot glue onto the rubber part of the lid, and press fabric onto the hot glue. If you feel like you need to add more fluff this is your last chance. When there’s a small opening like the picture shown below you can stuff more fluff in before you seal the circle.

photo 4

Step Four: Place lid on top of mason jar and screw the second lid over it. Because of the hot glue and the fabric the lid will not screw on all the way down, but it should still be able to close.

Step Five. Add any decorative things you’d like on the outside. Place push pins in the top, and any sewing materials you’d like on the bottom. Such as bobbins, buttons, pins, measuring tape, etc.

I made these as gifts for Mother’s Day, So I tossed a long piece of lace and buttons in the jars for looks.

image    image_1

Enjoy!


1 2 3 4